 Here are a few things I’ve learned about satellite TV, specifically, about using Dish Network with a home style dish as we travel.
Here’s a bit of background: we started off using an automatic dish. When it worked it was pretty good. When it didn’t work it was a real pain with no feedback as to why it wasn’t working. Here’s review 1 and review 2 on it.
When the automatic dish began to have issues I was faced with the decision of either sending it back to the factory for repairs or moving on to something else. I decided to go with a home style dish.
The reasons for the move were these: (1) financial (the home style dish is much less expensive), and (2) the home style dish gives me a home style TV watching experience (HDTV and ability to watch/record multiple channels at the same time).

So, I bought the dish and used it with an inexpensive tripod. I used a cheaper meter for aiming the dish. Honestly, it wasn’t a very happy experience. The manual I downloaded for my 1000.2 dish has an index where you can look up the setup based on zip code. I would set the skew, elevation, and azimuth (direction) based on that manual’s figures. Using that inexpensive analog meter and a compass I tried to aim the dish.
I would slowly move the dish side to side. When the meter started screaming, I would lock it down, go to the rear window of the camper and look at the satellite setup screen on the TV. Sometimes it would show that I had dialed in the satellites, sometimes it would show that I was on the wrong satellite, and sometimes, in spite of what the meter was saying, there was nothing.
I used this method with varying degrees of success for a bit over two years. However, I was learning as I went. As I learned I made some changes that have made setting up the satellite easier.

Upgrade #1: Dish actually has two sets of satellites called the eastern and western arcs. In a good part of the country you can use either one (the more northeast or northwest you go the more you are limited to just one or the other). Also, if you want local channels in HD, you want the eastern arc when in the eastern part of the US and the western arc in the western part of the US. I bought the second set of LNB’s for the eastern arc. I use the same dish, just swap out the LNB’s as I move east. However, in some parts of the country you can swap out when you can’t see the southern sky for one set of satellites. This is a pretty nifty work-around for tree filled campgrounds.

Upgrade #2: I bought the Dishpointer Pro app for my Android phone. It superimposes the location of the satellites on the camera screen. Using this app I can use the phone to see where I need to set up the dish where it has a clear view of the satellites. I’ve been known to hop out of the truck and use the app when selecting a campsite, knowing ahead of time that the satellites are in clear view from the campsite. I know there are other apps that supposedly do the same thing, but after trying a few of them I settled on this one, in spite of the higher cost. I think it was worth it.
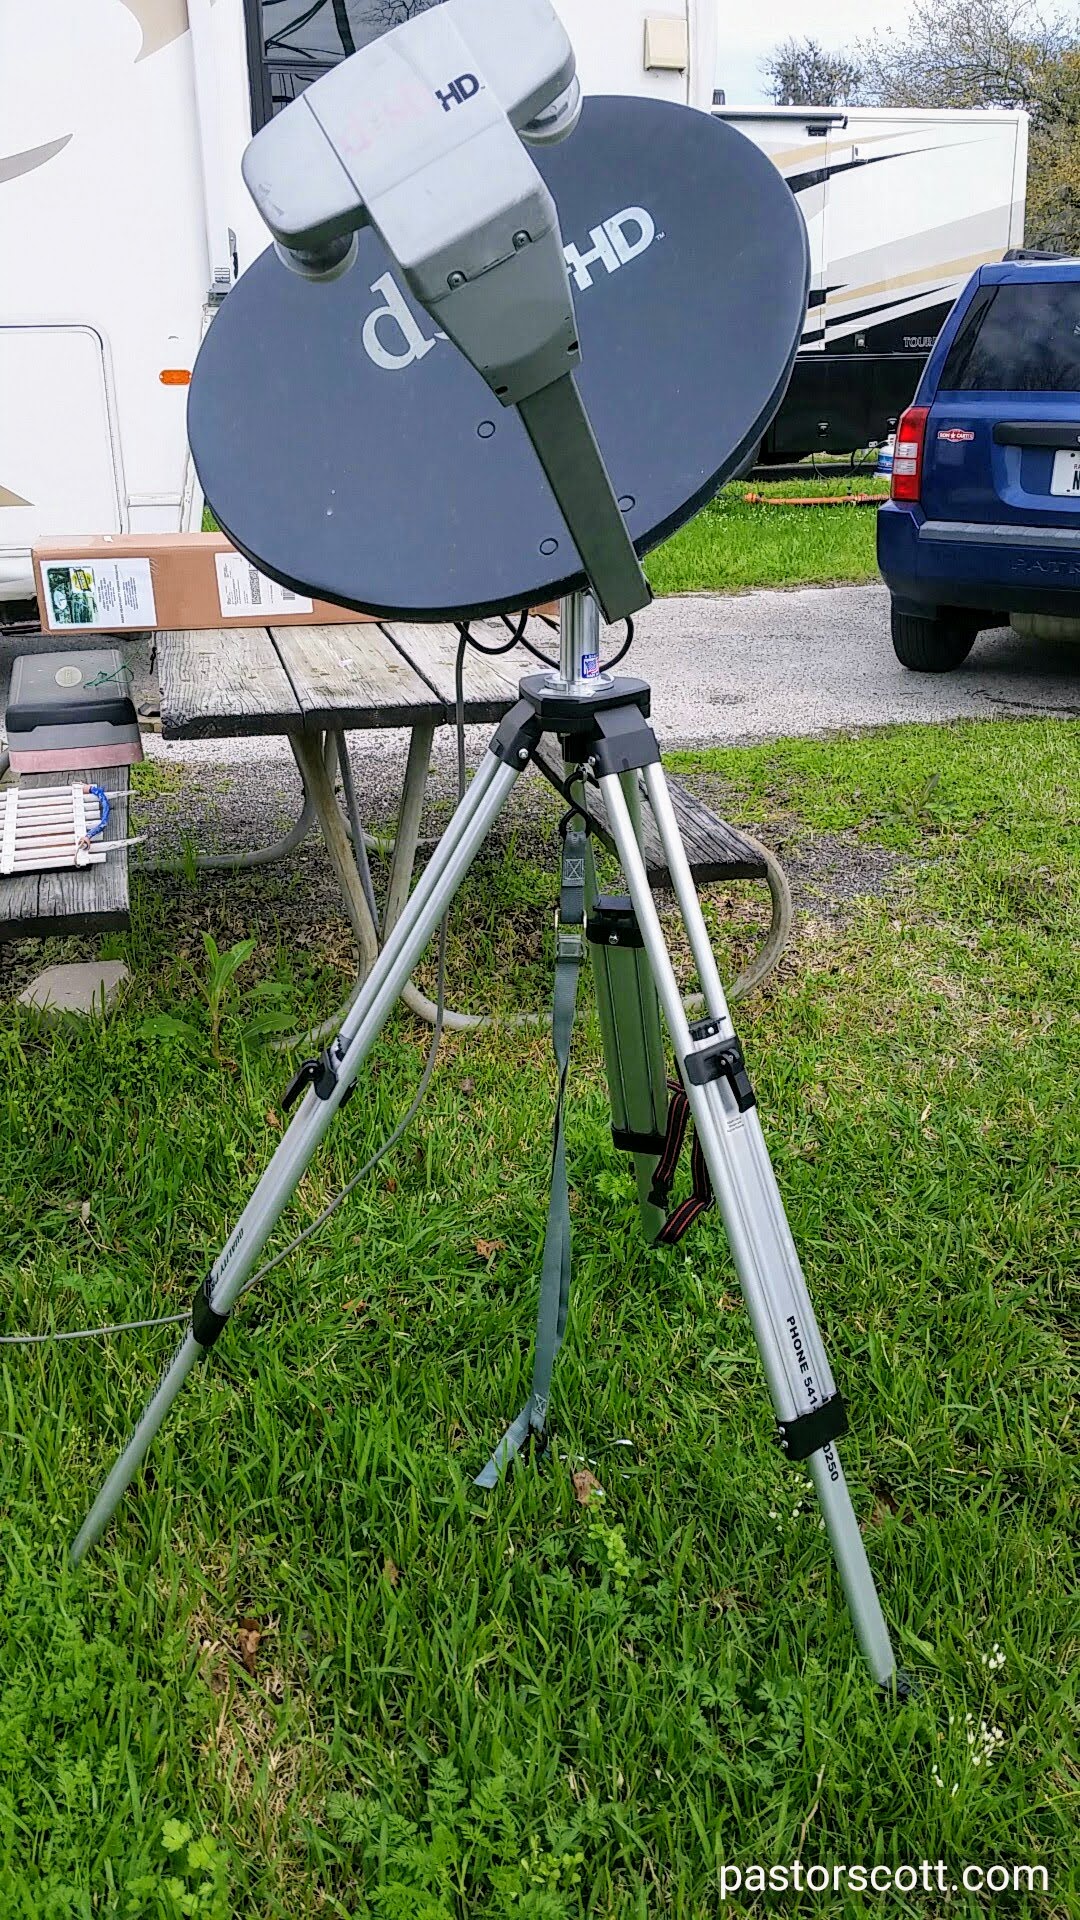
Upgrade #3: I bought a TV4RV tripod for the dish. Having the dish perfectly level is vital for aiming at the satellite. The legs on this tripod are individually adjustable which makes leveling easy. The tripod is also height adjustable. Fairly often getting just another foot higher means seeing the satellites or aiming at a tree limb. This tripod isn’t cheap, but it makes a huge difference when aiming the dish.
Upgrade #4: I got bluetooth headphones and stopped using the old analog meter. When the TV is on the satellite aiming screen, it makes a tone that changes in pitch depending on the strength of the satellite signal. With the headphones I can adjust the dish while listening to the tone from the TV. Some people spend a lot of money on meters that identify the satellite – I admit that would be better, but for the money, the headphones work great.
Using the above setup my home style dish setup time has decreased considerably. If you have a bit of technical ability, this approach might be for you. If you are a “plug and play” kind of person it is very unlikely you are still reading at this point, but if this describes you, you’ll probably want to spend the cash and get an automatic dish of some sort.
 One of the weak links in this setup, though, was my tripod. I inherited a small very basic one that is rather flimsy. If the ground is unlevel, I put something under one leg to attempt to level it. I also stake it out with guy wires to hold it steady in the wind. It works but is far from an elegant solution.
 The tripod is actually a modified surveyor’s tripod; each leg can be adjusted independently. A compass is supplied that fits right into the top of the tripod, and you are supposed to aim the direction before you ever mount the dish onto the tripod. One key is getting it perfectly level, something that is easy enough to do using a simple bubble level and the individually adjustable legs. The other key is getting it tall enough to “look over” any trees, etc. that are in the line of sight to the satellites. In some locations the sky is clear and I just leave it low to the ground. In a few places, though, I need all the height I could get.
